
How to Remove a Tick Safely: A Step-by-Step Guide
You're doing a post-hike tick check and there it is — a tiny, dark speck embedded in skin. It's easy to panic. It's also easy to do exactly the wrong thing. Knowing how to remove a tick safely isn't just a nice-to-have outdoor skill; it's the difference between a non-event and a weeks-long medical headache.
Ticks are vectors for Lyme disease, Rocky Mountain spotted fever, anaplasmosis, and a handful of other illnesses that can linger long after the bite itself. The CDC estimates that approximately 476,000 people are diagnosed or treated for Lyme disease in the U.S. every year — and many of those cases involve improper tick removal that may have accelerated transmission. The good news? With the right technique (and the right tool), safe tick removal takes about ten seconds.
This guide walks you through everything: what NOT to do first, a simple step-by-step removal process for people and pets, what to watch for afterward, and the chemical-free tool that makes the whole thing faster and less stressful for everyone involved.
Why How You Remove a Tick Matters
Not all tick removal methods are created equal — and some popular "folk remedies" can actually make things worse. When a tick is disturbed, frightened, or heated, it can regurgitate its stomach contents back into the bite wound. That's the moment disease transmission risk spikes.
Transmission of Lyme-causing bacteria (Borrelia burgdorferi) typically requires a tick to be attached for 36–48 hours. But the key word is "typically." Some pathogens can be transmitted more quickly, and any method that stresses the tick mid-removal compresses that window in the worst possible direction.
Speed and calmness are your two best tools plus one physical tool that actually works.
What NOT to Do When Removing a Tick
Let's bust some myths while we're at it. These are the most common mistakes — and every single one of them makes the situation worse.
❌ Don't twist or jerk
Twisting is the #1 mistake. Tick mouthparts are barbed and anchored. Twisting causes them to break off and remain in the skin, which leads to local infection and requires a separate removal entirely.
❌ Don't use petroleum jelly, nail polish, or butter
The logic is intuitive — smother it, it backs out. The reality: it doesn't back out. It panics. Smothering a tick causes it to secrete more saliva, increasing transmission risk and irritating the wound. Skip it.
❌ Don't use heat (matches, lighters, hot needles)
Same problem. Heat stresses the tick, triggering regurgitation. It's also just genuinely dangerous near skin and hair. There's no scientific support for this method and real risk of burns.
❌ Don't squeeze the tick's body
If you're using tweezers, grip at the mouthparts — as close to the skin as possible. Squeezing the body pushes its contents toward the wound. Grip low, pull straight.
How to Remove a Tick Safely — Step by Step
Here's the simple, science-backed process. It works whether you're dealing with a deer tick, lone star tick, dog tick, or any other species.
Step 1: Check for loose and crawling ticks first — with TiCK MiTT
Before you even look for embedded ticks, run TiCK MiTT over skin, clothing, and pet fur. TiCK MiTT is a scientifically-developed microfiber mitt — co-created with a tick scientist and product engineer — whose fabric ticks naturally adhere to on contact. It's designed to catch loose and crawling ticks before they bite. No chemicals. No squeezing. No stress.
To use it:
-
Slide the TiCK MiTT over your hand.
-
Rub firmly over skin, clothing, or pet fur — crawling ticks adhere to the microfiber on contact.
-
Place the mitt in the dryer on high heat for 10 minutes. Ticks are eliminated; mitt is reusable.
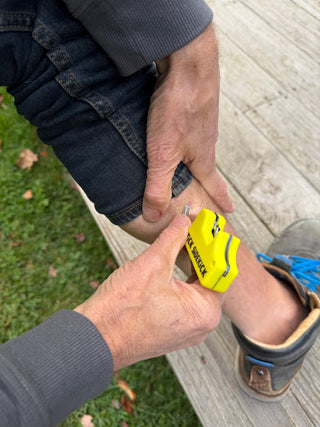
Step 2: If a tick is already embedded — use TiCK SiDEKiCK
If you find a tick that's already latched in, that's a job for the TiCK SiDEKiCK — the embedded tick removal tool designed to pair with TiCK MiTT as a complete protection system. Together they cover both sides of the tick encounter: TiCK MiTT stops ticks before they bite; TiCK SiDEKiCK handles the ones that got through.
To remove an embedded tick safely:
-
Position the TiCK SiDEKiCK as close to the skin surface as possible — at the mouthparts, not the body.
-
Apply steady, upward pressure. Don't twist or jerk.
-
If mouthparts break off and are easily accessible, remove them. If not, keep the area clean and let it heal.
-
Clean the bite site with rubbing alcohol or soap and water.
-
Dispose of the tick in rubbing alcohol, a sealed bag, or tape — don't crush it with your fingers.
No TiCK SiDEKiCK on hand? Fine-tipped tweezers work too.
Same rules apply: grasp at the mouthparts, steady upward pull, no twisting. Tweezers are a perfectly valid backup — TiCK SiDEKiCK just makes the job easier and more precise.
How to Remove a Tick from a Dog or Pet
Pets are prime tick targets — the fur makes them excellent hitchhikers — and dogs especially can bring ticks into the home and transfer them to family members without anyone noticing.
The best move is catching ticks before they embed — and that's where TiCK MiTT earns its place in the post-walk routine. The rub-over-fur motion is natural and stress-free for the animal — no poking, no prodding, no drama. Run it through the coat after every outdoor adventure to pick up any loose or crawling ticks before they find a spot to bite.
Pay particular attention to: ears, between toes, around the collar, under the armpits, around the groin, and at the base of the tail. Those are the favorite real-estate spots for ticks on dogs.
If a tick is already embedded, that's a job for TiCK SiDEKiCK. Use it to remove embedded ticks from pets using the same technique: position at the mouthparts, steady upward pressure, no twisting. Note the date, save the tick if possible, and watch for symptoms over the following weeks. Lethargy, lameness, swollen joints, and loss of appetite can all indicate tick-borne illness in dogs — loop in your vet if anything seems off.
How to Remove a Tick from a Child
Kids are low to the ground, love long grass, and have approximately zero interest in tick checks. That makes them high-risk, and it makes the tick-check process stressful for everyone — especially if it involves a sharp tool near a squirming child.
The KiDS TiCK MiTT (sized for ages 8–12) makes the post-outdoor check a much calmer experience. Rub it over the child's skin and clothing — the microfiber does the work. No chemicals touching sensitive skin. No tweezers near a moving target.
For embedded ticks on children, the same removal steps apply. If the child is particularly young (under 3) or the tick is in a difficult location (near the eye, inside the ear canal), call your pediatrician before attempting removal. They've seen it before and can guide you through it.
Once removed, document the bite: take a photo, note the date, and mark on a body chart where it was. This information is genuinely useful if symptoms develop later.
What to Do After Tick Removal
Removal is step one. What happens in the next few weeks matters just as much.
Clean and document the bite
Clean the bite site with rubbing alcohol or soap and water. Take a photo of the tick if you can — species identification can help your doctor assess transmission risk. If you're not sure how to identify it, your local health department or a service like TickSpotters (run by the University of Rhode Island) can help.
Save the tick if you can
Don't just flush it. Drop it in a sealed plastic bag or a small container with rubbing alcohol. Some labs will test ticks for pathogens — knowing what was on the tick is extremely useful context for your doctor if symptoms appear.
Monitor for symptoms
Most tick bites don't result in disease. But watch for the following over the 3–30 days post-bite:
-
A bullseye-shaped rash (erythema migrans) — the hallmark Lyme symptom, though not always present
-
Fever, chills, or fatigue
-
Muscle or joint aches
-
Headache or stiff neck
When to see a doctor
Go. In some high-risk areas and cases, a single prophylactic dose of doxycycline can prevent Lyme disease if taken within 72 hours of removal. Your doctor will know if that's appropriate for your situation.
Frequently Asked Questions
What is the safest way to remove a tick?
The safest method is to use a tick removal tool — like TiCK MiTT — that doesn't require squeezing, twisting, or direct contact with the tick. If you're using tweezers, grasp the tick as close to the skin as possible and pull upward with steady, even pressure. The key is to avoid methods that stress the tick (heat, petroleum jelly, twisting) which can increase disease transmission risk.
How long does a tick need to be attached to transmit Lyme disease?
The CDC notes that Lyme-causing bacteria typically require a tick to be attached for 36–48 hours to transmit. However, some other tick-borne pathogens can transmit more quickly. This is why prompt tick checks after outdoor activity — ideally using TiCK MiTT after every hike or time in the yard — matter so much. Don't wait to check.
Can I use TiCK MiTT to check for ticks on my kids and pets?
Yes — that's exactly what it's designed for. TiCK MiTT's microfiber fabric mimics the natural surfaces ticks adhere to, so running it over skin, clothing, and pet fur picks up loose and crawling ticks before they have a chance to embed and bite. It's chemical-free and safe for children and animals. The KiDS TiCK MiTT is sized for ages 8–12. If you find a tick that's already embedded, that's when you reach for the TiCK SiDEKiCK — the two tools work together as a complete system.
What should I do if tick mouthparts break off during removal?
It happens, especially with improper technique. If the mouthparts are easily accessible with tweezers, remove them. If not, leave the area alone — your immune system will typically push them out over time as the wound heals. Keep the area clean, watch for signs of infection (increasing redness, warmth, swelling, pus), and see a doctor if it looks infected.
Is there a difference between how to remove a tick from a dog vs. a person?
The technique is the same — grasp as close to the skin as possible, steady upward pressure, no twisting. The challenge with pets is anatomy (lots of fur, hard-to-reach spots) and cooperation (your dog has opinions). TiCK MiTT's rub-over motion works naturally on both pet fur and human skin, making it a versatile tool for the whole family. Check dogs in the high-risk spots: ears, between toes, under the collar, armpits, groin, and base of the tail.
The Bottom Line on How to Remove a Tick Safely
Tick season runs roughly March through October across most of the U.S. — and for anyone who spends time outside, that's a lot of potential exposure. Knowing how to remove a tick safely is one of those skills that takes two minutes to learn and could save you weeks of medical misery.
The short version: stay calm, act fast, don't twist or squeeze, remove the whole tick, document it, and watch for symptoms. The even shorter version: run TiCK MiTT over yourself, your kids, and your pets after every outdoor adventure — and let the science-backed microfiber do the heavy lifting before anything has a chance to embed.
You can't always control where ticks are. You can absolutely control how ready you are.
→ Ready to tick-proof your family? Shop TiCK MiTT at tickmitt.com — chemical-free, vet-approved, and featured on Shark Tank Season 16.


